


In the wild, preparation is everything. A well-designed bushcraft survival kit can be the difference between thriving in nature and struggling to survive. Creating one from scratch isn’t just practical—it’s an engaging project that helps you connect with essential survival principles.
Whether you're heading into the wilderness for the first time or are a seasoned outdoor enthusiast, this guide will walk you through crafting a survival kit tailored to your needs.
A bushcraft survival kit is a collection of tools and supplies designed to help you survive in the wild.
Unlike a general emergency kit, a bushcraft kit emphasizes self-reliance, resourcefulness, and skills like fire-making, shelter-building, and foraging. It’s compact, versatile, and focused on essentials.

Before you start gathering items, think about the following:
Environment: Are you venturing into a forest, desert, or mountainous terrain?
Duration: How long will you be outdoors? A day trip requires fewer supplies than a multi-day expedition.
Skill Level: Tailor your kit to your expertise. Beginners might need more pre-made tools, while experts can rely on raw materials.
Understanding your needs ensures you pack appropriately without unnecessary weight.

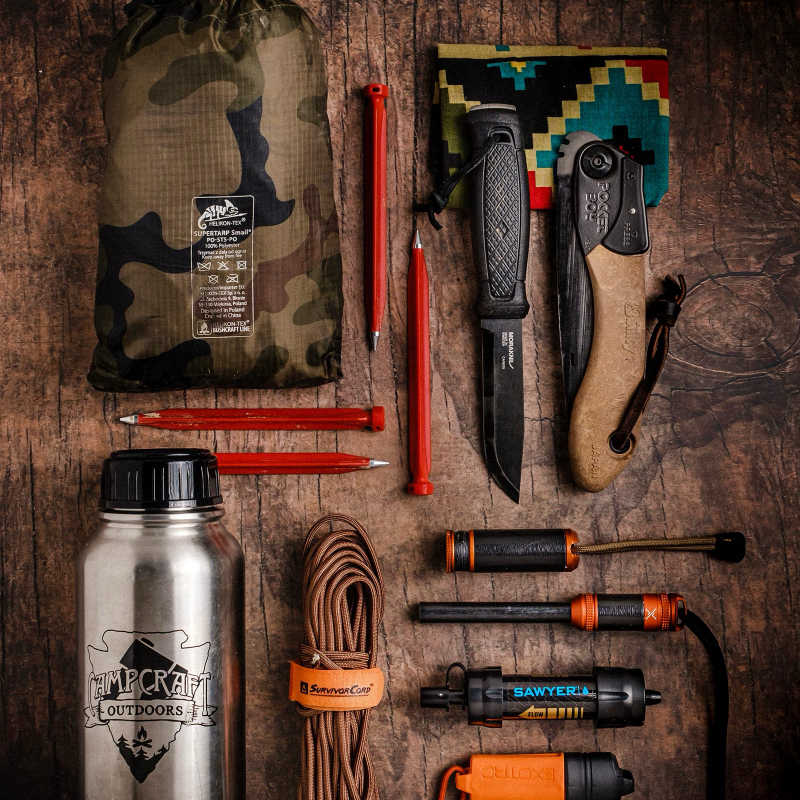
A bushcraft kit focuses on the essentials: shelter, fire, water, food, and navigation. Let’s break it down:
Tarp or Emergency Blanket: Lightweight and multi-functional, these provide quick shelter from the elements.
Cordage: Bring at least 50 feet of paracord for building shelters, snares, or lashing tools together.
Knife: A sturdy, full-tang bushcraft knife is indispensable for cutting, carving, and self-defense.
Clothing: Pack weather-appropriate layers, including a hat and gloves.
Ferrocerium Rod (Ferro Rod): Reliable and works in all weather conditions.
Waterproof Matches: Great as a backup.
Fire Tinder: Bring cotton balls soaked in petroleum jelly or collect natural materials like birch bark and dry grass.
Metal Container: For boiling water and cooking.
Water Filter: A compact straw filter or pump filter can make water safe to drink.
Purification Tablets: A lightweight backup method.
Snare Wire: For trapping small game.
Fishing Kit: Include hooks, line, and weights.
Edible Plant Guide: A pocket-sized guide helps identify safe-to-eat plants.
High-Energy Snacks: Pack lightweight, calorie-dense foods like nuts or energy bars.
Compass: A classic tool for orientation.
Map: A detailed map of the area you’ll explore.
Signal Mirror: For catching sunlight to signal rescuers.
Whistle: A lightweight, high-pitched whistle can be heard over long distances.
Basic First Aid Kit: Include bandages, antiseptic wipes, tweezers, and pain relievers.
Duct Tape: For makeshift bandages, gear repair, or even splinting.
Multi-Tool: A compact tool with pliers, scissors, and screwdrivers.
Saw Blade: A small folding saw or wire saw is great for cutting wood.
Notebook and Pencil: For jotting down survival notes or leaving messages.

Efficient packing is crucial for a bushcraft survival kit. Here’s how to do it:
Choose the Right Container: Use a durable backpack, dry bag, or a tin box for smaller kits.
Organize by Function: Group items by purpose, such as fire-making or navigation, and store them in labeled pouches.
Prioritize Accessibility: Keep critical items like your knife, ferro rod, and first aid kit within easy reach.
Test the Weight: Your kit should be light enough to carry comfortably but comprehensive enough to sustain you.

Once your kit is packed, take it for a test run. Spend a day or weekend practicing survival skills:
Build a Shelter: Use your tarp and paracord to create a simple lean-to.
Start a Fire: Practice with your ferro rod and tinder in different conditions.
Purify Water: Test your water filter and purification tablets.
Forage and Cook: Identify edible plants or use your fishing kit to catch a meal.
Testing your kit ensures you know how to use each item and highlights any gaps.

Your bushcraft survival kit is a living project. After each trip, evaluate its performance and make adjustments. Here are some ideas:
Upgrade Tools: Invest in higher-quality gear as your budget allows.
Add Seasonal Items: Include sunscreen in summer or hand warmers in winter.
Learn New Skills: The more you know, the less you need to carry. Consider taking a wilderness survival course.
Compact Solar Charger: Keep your devices powered.
Harmonica or Small Game: Lighten the mood during downtime.
Compact Book: A pocket guide on knots or survival tips.
DIY Tools: Create your own fishing lures or fire-starting kits.
Creating a bushcraft survival kit is more than just assembling gear—it’s about building confidence, learning resourcefulness, and fostering a deep respect for nature. Here’s what you’ll gain:
Practical Skills: From fire-making to navigation, these skills are invaluable.
Problem-Solving: Learn to adapt and innovate with limited resources.
Self-Reliance: Gain the ability to survive and thrive, no matter the circumstances.
Crafting a bushcraft survival kit is an empowering journey into the world of wilderness preparedness. It’s not just about the gear you pack, but the knowledge and skills you develop along the way. So grab your tools, start assembling, and head into the great outdoors with confidence. Remember: the best survival tool is the one you carry between your ears.
Happy adventuring, and stay safe out there!