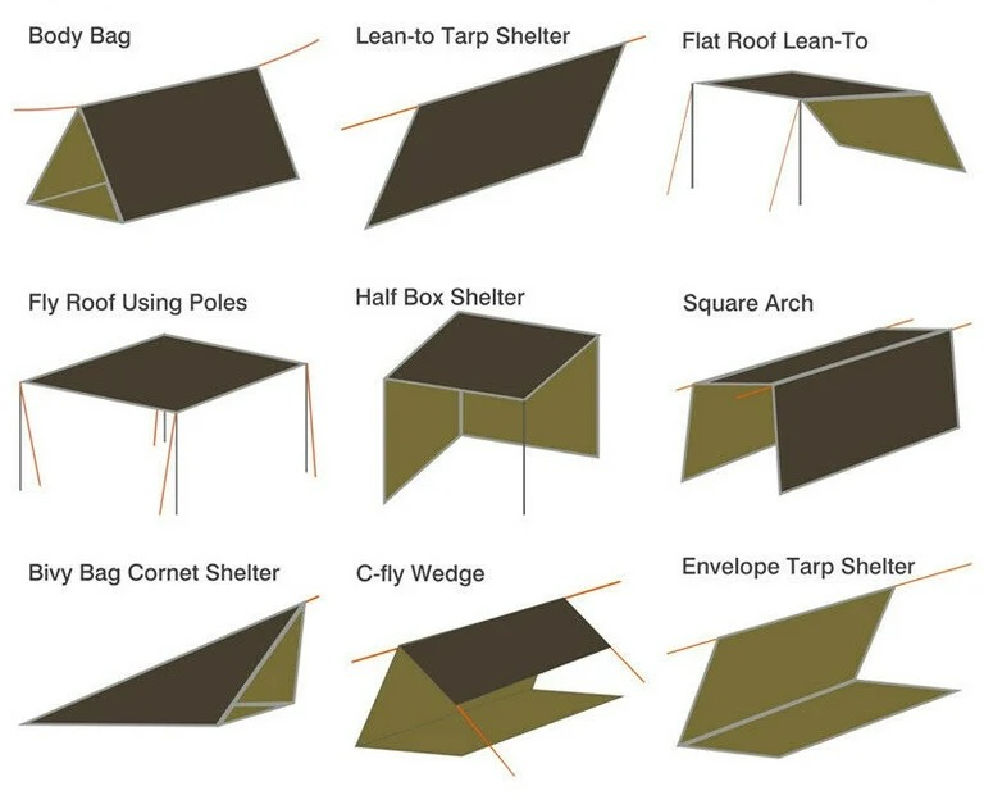
How to Make a Tarp Shelter: 8 Configurations for Survival
When you're out in the wild, a tarp shelter is one of the most versatile tools in your survival kit. Light, compact, and incredibly adaptable, tarps can shield you from rain, wind, sun, and even bugs.
Whether you're a seasoned adventurer or a beginner bushcrafter, knowing how to set up a tarp shelter is a vital skill. In this guide, we'll explore 8 different tarp configurations, each suited to various environments and conditions.
Let’s get started!
1. The Lean-To Shelter

Best For: Quick setup in moderate weather.
-
Setup:
-
Tie one side of the tarp to a sturdy horizontal branch or ridgeline.
-
Stake down the opposite side to the ground at a 45-degree angle.
-
-
Advantages: Simple and quick to assemble, provides good wind and rain protection from one direction.
-
Pro Tip: Position the open side opposite the wind direction.
2. A-Frame Shelter

Best For: All-around protection in varied conditions.
-
Setup:
-
String a ridgeline between two trees.
-
Drape the tarp over the ridgeline and stake down both sides.
-
-
Advantages: Symmetrical design offers protection from rain and wind on both sides.
-
Pro Tip: Use guylines to create a taut surface, preventing water pooling.
3. Plow Point Shelter

Best For: Windy conditions.
-
Setup:
-
Secure one corner of the tarp to the ground.
-
Pull the opposite corner upward and tie it to a tree or pole.
-
Stake down the remaining corners to the ground.
-
-
Advantages: Excellent wind resistance and fast to deploy.
-
Pro Tip: Reinforce the central attachment point for durability.
4. C-Fly Wedge

Best For: Low-profile protection in stormy weather.
-
Setup:
-
Anchor the back edge of the tarp close to the ground.
-
Pull the front edge higher and secure to a ridgeline or poles.
-
Stake down the sides to create a wedge shape.
-
-
Advantages: Aerodynamic shape resists strong winds and heavy rain.
-
Pro Tip: Use rocks or logs to weigh down the edges for added stability.
5. Flat Roof Shelter

Best For: Shading a group in sunny conditions.
-
Setup:
-
Suspend the tarp horizontally using four attachment points (trees or poles).
-
Secure each corner tightly with guylines.
-
-
Advantages: Provides ample shade and an open space underneath.
-
Pro Tip: Angle one side slightly downward to allow rain runoff.
6. Diamond Fly Shelter

Best For: Hammock camping.
-
Setup:
-
Secure two opposite corners of the tarp to trees above your hammock.
-
Stake down the remaining two corners to the ground.
-
-
Advantages: Covers your hammock while providing open views and ventilation.
-
Pro Tip: Adjust the tension for maximum coverage.
7. Tube Tent Shelter

Best For: Emergency overnight shelter.
-
Setup:
-
Run a ridgeline through the center of the tarp.
-
Fold the tarp around the ridgeline and stake down both sides to form a tube.
-
-
Advantages: Provides enclosed protection from all sides.
-
Pro Tip: Add insulation inside the tent for warmth.
8. Burrito Wrap Shelter

Best For: Solo survival in extreme cold.
-
Setup:
-
Lay the tarp flat and place insulating materials like leaves or pine needles on one side.
-
Roll yourself up in the tarp and insulation.
-
-
Advantages: Maximizes heat retention and is easy to create.
-
Pro Tip: Ensure the tarp edges are secured to prevent heat loss.
Final Tips for Tarp Shelter Success
-
Know Your Knots: Master essential knots like the bowline, taut-line hitch, and trucker’s hitch for secure setups.
-
Location Matters: Choose a flat, dry spot away from potential hazards like falling branches or rising water.
-
Be Prepared: Always carry extra paracord, stakes, and repair tape for versatility and quick fixes.
With these 8 tarp shelter configurations in your arsenal, you'll be ready to face a variety of survival scenarios.
The beauty of tarps is their adaptability—experiment with these setups, and don’t be afraid to innovate.
After all, survival is about making the most of what you have. So grab your tarp, head into the wild, and start practicing!

